Wednesday 18 June 2008

Dad's woodwork...

I just wanted to share this beautiful bowl that my dad made for us.
We had our fireplace replaced last year - the old one was a brick monstrosity that filled almost one wall of our living room. It included a large plank of solid mahogany which was too good to go in the skip so it went to my dad instead. As you can see he's a very skilled craftsman...

Make this... Memory Wire Bangle

If you'd like to make a bangle like the one below...

Monday 16 June 2008

Bangle...


I've just added this bangle to The Secret Jewellery Boutique

More jewellery...


All this jewellery has recently been added to Just K Jewellery. I've called the earrings above chocolate earrings as I think the beads look like Maltesers!


I spent hours trying to get a photo that truely shows just how pretty these beads are - and I still don't think I've achieved it. I've used sterling silver eyepins & earwires to make them that little bit more special.


This is a fun bracelet using a chunky foiled bead, different coloured seed beads & silver stars.

Thursday 12 June 2008

More Resin Pendants...

I'm really pleased with the way these pendants have turned out. The purple oval pendant above has pink & purple seed beads embedded in the resin.

The sparkle in this turquoise heart is glitter added to the resin before it cures

This purple flower has fragments of shell embedded in the resin (crushed by my own fair hand & the assistance of a rolling pin)


Resin Pendants...

The pendant bails have arrived from the USA. A really helpful person on one of the forums I use has given me the name of a UK supplier

These are a couple of the resin pendants that I've made

Wednesday 11 June 2008

Make this... Aqua Beaded Necklace


You will need
22" tigertail
2 x crimps
1 x trigger clasp
1 x tag
16 x 12mm aqua coloured iridescent twisted glass beads
8 x 6mm semi precious crystal gemstones
7 x 4mm decorative silver beads
32 x turquoise coloured seed beads
32 x silver seed beads

Instructions
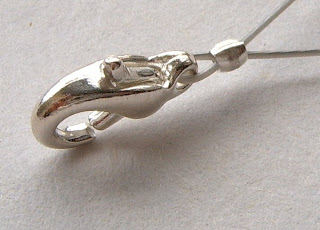
thread a crimp onto the tigertail, through the loop of the trigger clasp & then back through the crimp


pull the tigertail to position the crimp close to the loop of the trigger clasp. Flatten the crimp with flat nose pliers or use crimping pliers


add the beads onto the tigertail as per the photo below


to finish the necklace you need to add the tag. Use the same technique you used to add the trigger clasp. Trim off the excess tigertail. For extra security thread the tigertail back through the last few beads of the necklace before you trim the tigertail
I will be adding kits to make this necklace to Just K Jewellery.
I also have some of the aqua coloured glass beads for sale on Just K Jewellery.

Tuesday 10 June 2008

Resin shells...


I made the molds for these resin shells from real shells. I'll probably make them up into earrings and a pendant set. I'm waiting for some aanraku pendant bails to arrive that fix to the back of the bead & can't be seen. I've had to order them from the USA as I couldn't find a UK supplier

Monday 9 June 2008

We went to Canterbury...

We went to Canterbury this weekend to visit my son & his fiancee. Had a lovely meal & caught up on all the news.

It's a long story & I won't bore you but the recipes for peppercorn sauce are below

Tuesday 3 June 2008

Make this pair of Cherry Earrings...


This is a really easy pair of earrings to make. Either buy a kit from Just K Jewellery or follow the instructions using your own beads & findings.

You will need...
a pair of fish hook earrings
2 x head pins
2 x 15mm silver tubes
4 x tiny silver or seed beads
2 x 10mm cherry red glassbeads

Tools... round nose pliers & wire cutters

INSTRUCTIONS
Take a head pin and add a small silver bead and a cherry red bead.

Add another small silver bead and a silver tube.

You will need 1cm of the head pin to turn a loop. Cut off the excess wire and bend the remaining wire to a 90 degree angle.

Turn a loop in the remaining wire of the head pin.

Open the loop on a fish hook earring and add the head pin.

Close the loop of the earring.

Repeat this process to make the other earring.